Store selector section
The Store selector section of Local connects your Shopify locations to a store picker, so customers choose a store and see pickup availability.
Applies to: Local 4.2.1 and later. Added in: Local 1.0.0. Last checked: 2026-10-13 against Local 4.2.1.
The store selector is one of Local's main features. It lists your physical stores in a popup, connected to the locations you sell from in Shopify. A customer picks a preferred store; the header then shows that store, and the pickup availability lines on product pages and product cards show whether a product is in stock there.
Where to find it: Store selector (Theme editor sidebar, after the Footer group)
How the store selector works
- The Store selector is a section that is part of every page. You do not add it to a page; you select it in the theme editor sidebar and add one Store block per store. Selecting the section in the editor opens the popup in the preview.
- Customers open the popup from the Store selector block in the header, or from the "Choose a store to see local availability" link of a pickup availability line.
- With several stores, the customer checks a store and selects Set as my store. With one store, Local selects it automatically and the popup is titled "Pickup location".
- The choice is saved in the customer's browser, so it stays when they come back on the same device. It is not saved in their customer account.
- The availability is information only. Customers still choose pickup or delivery, and their location, at checkout.
Each Store block is matched to a Shopify location by its name. Only locations that offer local pickup in Shopify can match.
Store blocks
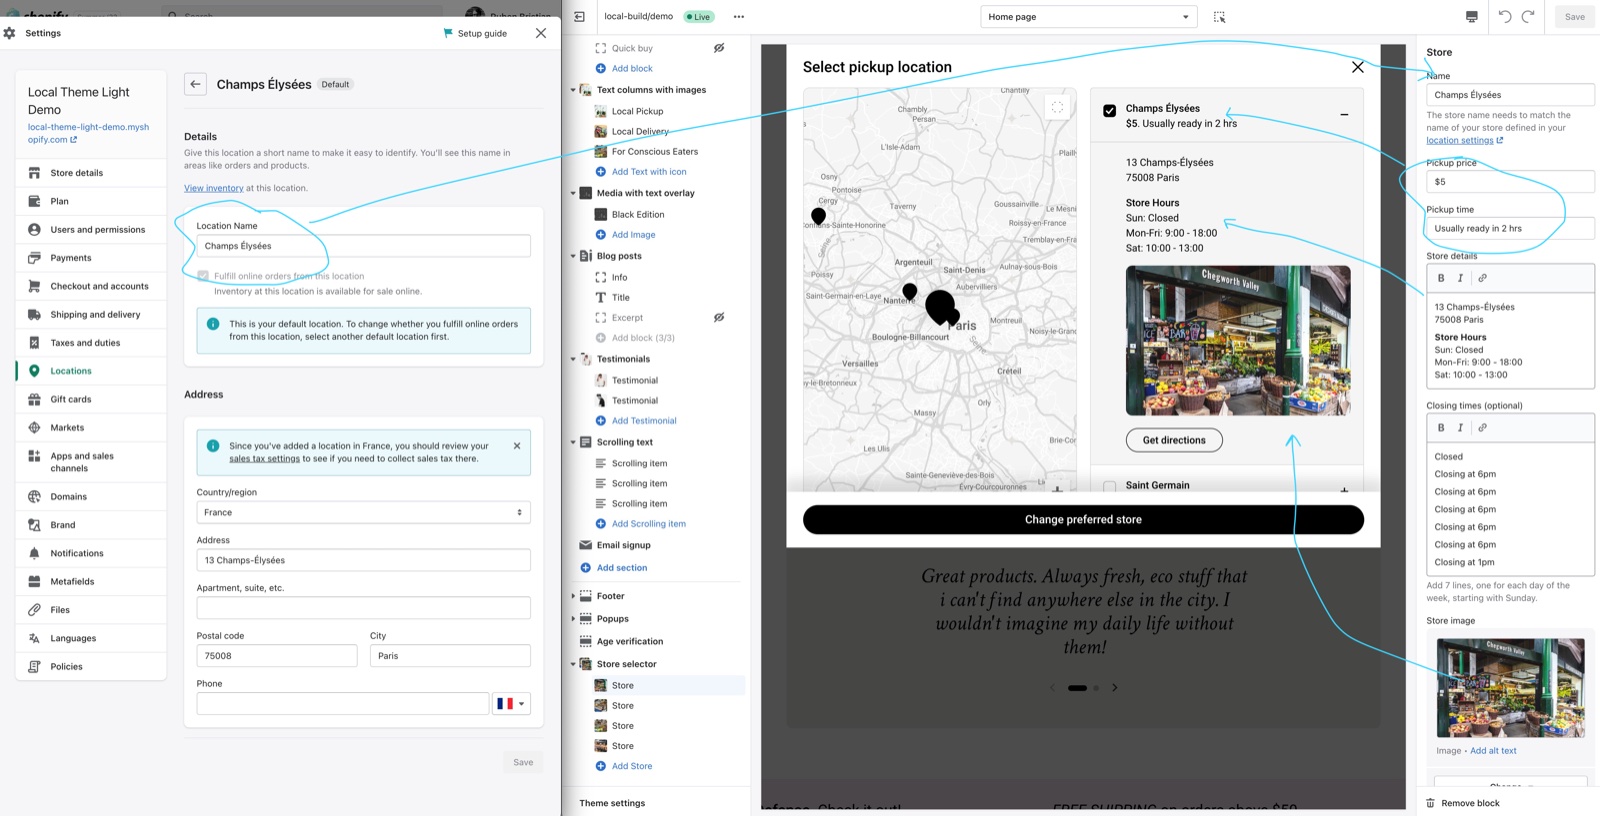
- Name must be the name of the matching location in Shopify admin → Settings → Locations. Capitals, spaces and punctuation may differ ("Main Street Store" matches "main-street store"), but the words must be the same.
- Pickup price and Pickup time show under the store name in the list, for example "Free. Usually ready in 24 hrs". They are display text: the real pickup price and time are set in Shopify.
- Store details is the text that opens under the store: address, opening hours, what to expect at pickup.
- Closing times (optional) feeds the closing time shown next to "My store" in the header. Write exactly seven lines, one per day, starting with Sunday, for example "Closed", "Closing at 5pm", and so on. Press Enter between lines; Shift + Enter joins two lines into one and breaks the order.
- Store image shows a photo of the store inside its details. In Local 4.2.1, it shows only when Enable dynamic map is on.
Map pin group:
- Latitude and Longitude place the store's pin on the map, as decimal coordinates (for example 48.8698 and 2.3076). New blocks start with example coordinates: replace them. Google explains how to find them in Get the coordinates of a place.
- With both coordinates and Store details filled, the store shows a Get directions button that opens Google Maps at those coordinates. Custom link replaces that address with your own link, for example your Google Maps business page.
- Custom pin replaces the default map pin with your own 90 x 90 px transparent PNG.
Stores map
The popup can show your stores on a Google map next to the list. Clicking a pin selects its store, and the other way around.
- Enable dynamic map shows the map. It needs a Google Maps API key in Theme settings → Maps, see Maps theme settings.
- Map zoom sets how close the map starts, from 2 (the world) to 19 (a street).
- Map style chooses one of six looks: Standard, Silver, Retro, Dark, Night or Aubergine. It is hidden when you use a Google Maps Map ID.
- Tag style pin (only with a Map ID) replaces the image pins with labels that show each store's name.
The map first fits all your pins, then applies Map zoom around their center. A high zoom, such as the default 16, can push stores that are far apart out of the map. Lower the zoom until the preview shows every pin.
Setting up the store selector
Before you start, your stores must exist as locations in Shopify, with local pickup turned on. This is Shopify's own setup, see Set up local pickup in the Shopify Help Center.
Create a location per store
In Shopify admin, open Settings → Locations and add each physical store as a location, with its address. Give each location stock of the products it holds.
Turn on local pickup for each store
Open Settings → Shipping and delivery → Local pickup. Select each store location and turn on This location offers local pickup, with its pickup time. Locations without local pickup never show availability in Local.
Open the Store selector section
In the theme editor, select Store selector in the sidebar, after the Footer group. The popup opens in the preview.
Add one Store block per store
Select Add block → Store once for each store. Type the location's name in Name, exactly as in Settings → Locations (capitals and punctuation may differ).
Fill in the store information
Fill Pickup price, Pickup time and Store details. Optional: write the seven Closing times (optional) lines, Sunday first, one per line.
Place the store on the map
Type the store's Latitude and Longitude, replacing the example values. Optional: upload a Custom pin and add a Custom link for the Get directions button.
Turn on the map (optional)
With a Google Maps API key in Theme settings → Maps, turn on Enable dynamic map and set Map zoom and Map style (or Tag style pin with a Map ID). Select Save.
The tutorial at 13:50 in the Local video tutorial shows the store selector setup. It was recorded on an older version of Local: the Map ID, Tag style pin and Custom link settings are newer than the video.
Showing the selected store in the header
Add the Store selector block
In the theme editor, open Header group → Header and select Add block → Store selector. A header holds one Store selector block.
Choose an icon (optional)
Upload a Custom icon (76 x 76 px PNG) to replace the store icon, then select Save.
Show it on mobile
In the Header section, set Header info blocks → Choose an option to Show always to show the block in the header on phones. Keep Mobile navigation → Show store selector & info blocks on to show it in the mobile drawer.
Before a store is picked, the block says "Picking up?" and "Select store". After, it says "My store", today's line from Closing times (optional), and the store name.
Showing availability on product pages and cards
Local has two pickup availability lines that use the store selector, both called "Compact":
- On the product page: the Pickup availability block with Style set to Compact.
- On product cards: the Local availability block of product grids (collection pages, featured collections, search results and other grids).
Each shows "Available for pickup at [store]" or "Out of stock at [store]" for the customer's store, or "Choose a store to see local availability", which opens the store selector.
Finish the store selector setup
Complete the steps in "Setting up the store selector" above: locations with local pickup, and one Store block per location with the matching Name.
Add the line to the product page
In the theme editor, open Products → Default product → Product page and select Add block → Pickup availability. Set Style to Compact. Repeat on other product templates.
Add the line to product cards
Open each page with product grids (for example Collections → Default collection → Product grid) and select Add block → Local availability. Drag it where it should sit in the card.
Test it
Select Save, open your store, pick a store in the store selector and check a product you hold at that location.
The Extended style of the Pickup availability block works without the store selector: it lists the Shopify pickup locations that have the product, with their pickup times and addresses. See Product availability blocks for both styles, and Product grid blocks for the Local availability block.
Does choosing a store change the delivery method at checkout?
No. The store selector is information only: it tells customers where a product is in stock. They choose pickup or delivery, and the pickup location, at Shopify checkout, which Local does not control. A product that is out of stock at their store can still be bought. To hide the buy buttons in that case, a developer can add code, see Hide purchase buttons when local pickup is not available.
Why does a store show no availability?
Because Local cannot match the Store block to a Shopify location with local pickup. Every product then says "Out of stock at [store]". Check that:
- Name has the same words as the location name in Settings → Locations.
- The location offers local pickup in Settings → Shipping and delivery → Local pickup.
- The product has stock at that location. Product cards check the first available variant of the product.
More causes are on Troubleshoot the store selector and maps.
All Store selector settings
Every setting, with its type and default, including the Store block settings.
Accepts these blocks: Store.
This theme allows you to connect your real store locations to an interactive store selector.
Store selector section: Stores map
Where to find it: Store selector → Stores map
Enable dynamic map (checkbox, default: off): Shows a Google map with the store pins in the store selector popup. Needs Theme settings → Maps → Google Maps API key. While on, every page view loads a map, because the popup is part of every page.
Map zoom (slider 2 to 19, default: 16): Sets the zoom level the map starts with, from 2 (world) to 19 (street). Local fits all pins first, then applies this zoom around their center, so a high value can hide stores far apart.
Map style (dropdown, default: Standard): Sets one of six built-in map looks. Hidden when Theme settings → Maps → Google Maps Map ID is set; the Map ID style is used then. Options: Standard, Silver, Retro, Dark, Night, Aubergine. Shown only when Theme settings → Maps → Google Maps Map ID is empty.
Tag style pin (checkbox, default: off): Replaces the image pins with labels showing each store's name. Shown only when a Google Maps Map ID is set. Shown only when Theme settings → Maps → Google Maps Map ID is set.
Store block
Where to find it: Store selector → Add block → Store
Name (text field, default: "My Store"): Must have the same words as the Shopify location name in Settings → Locations; capitals, spaces and punctuation may differ. Only locations that offer local pickup can match.
Pickup price (text field, default: "Free"): Sets the price text shown under the store name in the list. Display text only: the real pickup price is set in Shopify.
Pickup time (text field, default: "Usually ready in 24 hrs"): Sets the pickup time text shown under the store name in the list.
Store details (rich text, default: "123 John Doe Street Your Town, YT 12345 Store Hours Sun: Closed Mon-Fri: 9:00 - 17:00 Sat: 10:00 -…"): Sets the details that open under the store: address, hours, pickup information. The Get directions button needs it filled.
Closing times (optional) (rich text, default: "Closed Closing at 5pm Closing at 5pm Closing at 5pm Closing at 5pm Closing at 5pm Closing at 1pm"): Seven lines, one per day starting with Sunday (press Enter between lines). The header Store selector block shows today's line next to My store.
Store image (image): Sets a store photo inside its details. In Local 4.2.1 it shows only when Enable dynamic map is on.
Store block: Map pin
Where to find it: Store selector → Add block → Store → Map pin
If the map is enabled, you need to define a custom pin for this address. Learn how to get your address coordinates.
Latitude (text field, default: "46.7834818"): Sets the latitude of the store pin, in decimal degrees. New blocks start with an example value: replace it. With both coordinates, the store shows a Get directions button.
Longitude (text field, default: "23.5464733"): Sets the longitude of the store pin, in decimal degrees. New blocks start with an example value: replace it.
Custom pin (image): Replaces the map pin of this store with your own 90 x 90 px transparent PNG. Not used with Tag style pin.
Custom link (link): Replaces the Google Maps address of the Get directions button with your own link.
Related pages
- Maps theme settings: the Google Maps API key and Map ID.
- Product availability blocks: the Pickup availability block on the product page.
- Stores map section: a map of your stores on any page.
- Hide purchase buttons when local pickup is not available: the code tweak for developers.
- Troubleshoot the store selector and maps: when a store or the map does not show.
Header menus and mega menus
Header menus and mega menus in Local: turn a submenu into a mega menu with the Mega menu block, menu images and up to two promotions.
Footer group
The Footer group of Local holds the Footer section with text, menus, images, payment icons and an email signup, plus any section you add.