Header menus and mega menus
Header menus and mega menus in Local: turn a submenu into a mega menu with the Mega menu block, menu images and up to two promotions.
Applies to: Local 4.2.1 and later. Added in: Local 1.0.0. Last checked: 2026-10-13 against Local 4.2.1.
The header menu comes from a Shopify navigation menu. A top-level item with links below it opens a small dropdown. With a Mega menu block, that dropdown becomes a large, full-width panel: its links are laid out in columns, with optional images and up to two promotion tiles.
Where to find it: Header group → Header → Add block → Mega menu
How the menu is built
- The header shows the menu chosen in Header → Menu (
main-menuby default). Edit its items in Shopify admin → Online Store → Navigation. - Menus can have three levels: top-level items in the header, second-level links in the dropdown, and third-level links under them.
- A normal dropdown lists the links one under the other. A mega menu lays the second-level links out as columns, with their third-level links below each one.
- On mobile, the menu opens in the navigation drawer as a regular menu with submenus. A mega menu's promotions appear inside its submenu.
Mega menu block
- Menu handle tells Local which top-level item becomes a mega menu. It is the handle of that item: its title in lowercase, with hyphens instead of spaces. The item "Our Promotions" has the handle
our-promotions. - Add one Mega menu block per top-level item you want to turn into a mega menu. There is no limit.
Link lists layout
- Link lists layout sets how many columns the second-level links fill: 2, 3, 4 (default) or 5 columns.
Menu images
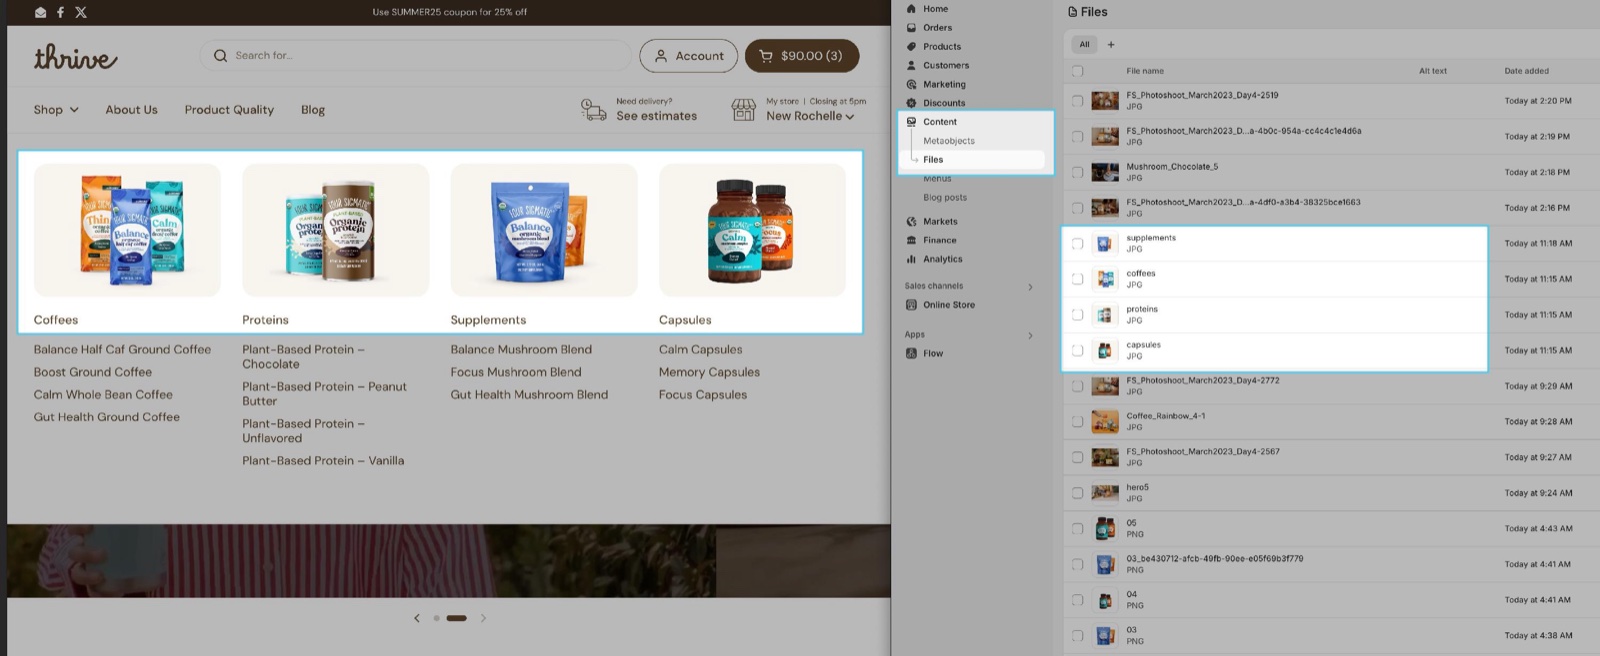
- Show menu images shows an image above each column of the mega menu.
- The images come from Shopify admin → Content → Files. Each one is named after the handle of the second-level link it belongs to: the column "Coffees" uses
coffees.jpg(orcoffees.webp).
On mobile, the image will only be displayed if the corresponding menu item has submenu items, in which case it will appear at the bottom.
Promotions
A mega menu can show up to two promotion tiles at its right side: Promotion 1 and Promotion 2. Turn each one on with Show promotion block.
- Title, Subtitle and Button label are the texts of the tile, each with its own size setting. Button link is where the button goes.
- Promotion text color colors the texts, and the button background.
- Promotion background color fills the tile. With a Promotion image, the color lies over the image at 30 percent opacity, which helps the text stand out.
- Promotion height sets the tile to Small, Regular or Large.
Setting up a mega menu
Build the menu in Shopify
In Shopify admin → Online Store → Navigation, open the menu used by the header (main-menu unless you chose another one in Header → Menu). Give the top-level item at least one level of links below it, for example "Shop" with "Coffees", "Proteins" and "Supplements".
Work out the item's handle
Write the title of the top-level item in lowercase and replace spaces with hyphens: "Shop" becomes shop, "Our Promotions" becomes our-promotions.
Add the Mega menu block
In the theme editor, open Header group → Header and select Add block → Mega menu.
Type the handle
Type the handle in Menu handle, in lowercase and with hyphens. The dropdown of that item now opens as a mega menu in the preview.
Choose the layout and promotions
Set Link lists layout, then turn on Show promotion block under Promotion 1 or Promotion 2 if you want a tile, and fill it in. Select Save.
The menu handle is case sensitive. Type it in lowercase with hyphens between words, for example arabic-books. Renaming the menu item in Shopify changes its handle, so update Menu handle too.
Adding menu images
Find the handles of the columns
The images belong to the second-level links of the mega menu (the columns). Write each link's title in lowercase with hyphens: "Coffees" is coffees, "Gift Boxes" is gift-boxes.
Name and upload the images
Save one image per column as a JPG or WebP file named after its handle, for example coffees.jpg. Upload them in Shopify admin → Content → Files.
Turn on the images
In the theme editor, select the Mega menu block and turn on Show menu images. Select Save.
Why does my mega menu not show?
Because Menu handle does not match a top-level item of the header menu. Check that the handle is in lowercase with hyphens, that it belongs to an item of the menu chosen in Header → Menu (not of another menu), and that the item has links below it. More checks are on Troubleshoot the header, menus and popups.
Why do some menu images not show?
Because the file name does not match the link's handle, or the file is not a JPG or WebP. Local looks only for <handle>.jpg, then <handle>.webp, in Content → Files; PNG files are not used. The handle comes from the second-level link (the column), not from the top-level item.
Can I add images to a normal dropdown?
No. Menu images and promotions are part of the Mega menu block only. Turn the dropdown into a mega menu to use them.
Related pages
- Header section: the menu, logo and header blocks, with every Mega menu block setting.
- Troubleshoot the header, menus and popups: when a menu or image does not show.
- Code tweaks: CSS changes to the header and footer.